Showing posts with label tomatoes. Show all posts

Wednesday, March 7, 2012

Pork Chops with Apples, Fresh Thyme, and Sweet Onions


I am picking up a third of a pig (a Red Wattle raised in Northern California named Sam and given massages everyday. Those last two tidbits are not true.) on Saturday, so I need to do some clearing out of the pork that remains from my 2011 pig. There isn't much pork left, but one pack of pork chops did remain, so I removed it to defrost and cook up.

I haven't made anything from my trusty Cast Iron Skillet Cookbook in a while, so that is where I turned first. There are only two recipes for pork chops in the book, and the one calling for smoked pork chops sounded better to me. My pork chops are not smoked, but I was sure it would taste good none-the-less.

1 Tbsp extra virgin olive oil
1/2 medium sweet yellow onion, very thinly sliced
3 apples, peeled, quartered, and cored
1 tsp fresh thyme leaves, or 1/2 tsp dried thyme
1/2 tsp salt
4 smoked pork chops, 1/2 inch thick


(I only made one pork chop, so I only made a quarter recipe.)


1. Heat the oil in a 10- or 12-inch cast iron skillet. Add the onions and cook over medium heat for 5 minutes, stirring occasionally. Slice the apples crosswise into 1/2 inch thick slices and add to the onions. Add the thyme and salt.


2. Place a square of parchment paper directly on top of the apples. Simmer on top of the stove over medium-low heat for 10 minutes. Meanwhile, preheat the oven to 350F.


3. Remove the parchment paper and place the smoked (or not smoked) pork chops on top of the apples. Cover with aluminum foil. Using a fork, poke holes in the foil 4 or 5 times. Place the skillet in the oven and bake for 18 minutes. Serve immediately.

I picked out this recipe yesterday after I took the chops out of the freezer to defrost. I even typed up the recipe and the intro yesterday. Then tonight, like so many other nights, I was still at work at 7.45. I didn't even have all the ingredients at home! Determined to eat something other than popcorn for dinner, I went straight to the store for my missing items, and cooked up these delicious pork chops. Thank goodness the prep work and cooking time are minimal.

Oh, and I have this Hickory Seasoning Liquid Smoke stuff that an ex of mine once used to make Kalua pork. As I was prepping the meal, I saw it amongst my spices. Since the chop was supposed to be smoked, why not throw some liquid smoke on it?  So I did. I also sliced an heirloom tomato and topped it with a sprinkle of a little salt and a drizzle of olive oil.

Let me tell you, this meal was DELICIOUS. I don't even like apples, but something about the combo of the sweet cooked apples and onions and the pork and the saltiness was perfection. Also, I was really hungry. I am SO happy I bucked up and made a real meal tonight!

Bon appetit.

Friday, February 17, 2012

Roast Beef with Roasted Tomato Chimichurri


This roast beef is sort of a big deal for me because I have never made roast beef. One of the three cuts of meat left from my 2010 cow was a sirloin tip roast. It lingered in my freezer for this long because I don't know off the top of my head what to do with a sirloin tip roast. Apparently you roast it. Which I did. And it was delicious.


The best-sounding recipe I found by googling "sirloin tip roast" was for a Sirloin Tip Roast with Spicy Roasted Tomato Sauce. Looking at the recipe, the sauce was just chimichurri with roasted tomatoes in it. I am calling a spade a spade and changing the name of the recipe to Roast Beef with Roasted Tomato Chimichurri. 


I have made the Brussels sprouts before (see here) so I won't re-post the recipe. But let me tell you, it is the tastiest and easiest Brussels sprouts recipe ever.


Roast Beef:
1 (2 to 2 1/2-pound) sirloin tip roast
3 tablespoons olive oil
4 Roma tomatoes, cut in half
2 teaspoons herbs de Provence
Kosher salt and freshly ground black pepper


Roasted Tomato Chimichurri Sauce:
1 1/2 cups fresh flat-leaf parsley
2 garlic cloves
1/2 teaspoons red pepper flakes
3/4 teaspoon kosher salt
3/4 teaspoon freshly ground black pepper
2 tablespoons red wine vinegar
1/2 cup extra-virgin olive oil


1.  For the roast beef, preheat the oven to 375 degrees F.


2.  Season the beef with salt and pepper. Season the tomatoes with salt, pepper, and herbs de Provence.


3.  Place a Dutch oven over medium-high heat and heat the olive oil. Sear the beef over high heat on all sides. Turn off heat. Place the seasoned tomatoes around the seared beef and place the pan in the oven. Roast until a meat thermometer reads 130 degrees F. for medium rare, 135 for medium, about 30 to 40 minutes. Take the roast out of the oven, tent loosely with foil, and let rest for 10 to 15 minutes. The internal temperature of the meat should rise 5 degrees F more and the juices will redistribute into the roast.


4.  For the chimichurri, place the parsley and garlic in a food processor and pulse until the parsley is finely chopped. Add the red pepper flakes, salt, red wine vinegar and the roasted tomatoes from the beef pan and process until pureed. Add the olive oil in a steady stream with the machine running.


5.  To serve, slice the roast and place on a serving platter. Drizzle a little sauce over the meat. Serve the remaining sauce in a small bowl alongside.


Because, like a normal human being I do not eat an approximately 3 pound roast in one sitting or pretty much anything I cook in one sitting, I have to be good about using leftovers. Roast beef is a pretty easy thing for leftovers. Who doesn't love roast beef, cheddar, horseradish, and mustard on a crusty roll? Here is the sandwich I ate the day after I made the roast.


Bon appetit.

Wednesday, September 28, 2011

Oktoberfest and Grüner


I think that the weekends my mom comes to visit result in the best Princeton Eats Portland posts, and I know that is because my mom and I do some damn good eating. This past weekend was no different.

Friday night, a friend of mine and I picked up my mom and headed straight to Gustavs/Rheinlander for Oktoberfest. Not one of the three of us expected the festivities that were occurring in the tent covered parking lot adjacent to the restaurant - long tables packed with people guzzling beer out of 1.5 liter steins, a German band playing all the latest polka hits, sausages, pretzels, and fondue galore. Above are some pictures to give you an idea of how awesome it was.

We may have indulged in a bit too much beer, and had it not been for the sausages, pretzels, bread and fondue we ate, it might have been a rough Saturday morning. Instead, my mom and I hopped out of bed around 7am to run 10 miles. "Hopped out of bed" is not really what we did, but we did run the easiest 10 miles either of us have ever run. We agree that perhaps we hadn't yet metabolized all the alcohol from the night before making the run a bit easier. Who knows.

After the run, we wiled away the day eating and drinking and watching football, basically wasting time until dinner. Not to downplay the eating and drinking we did; we had a wonderful breakfast at Bakery Bar, beers at Migration, lunch at Pambiche, then more beers at Migration. Oh, and a hunt for remaining Missoni for Target stuff resulting in a THROW PILLOW for me! And my mom scored an adorable zig zag bikini bottom for $6.  Why it was marked down is a mystery.  A fantastic mystery.

Thank you to whoever returned this to the Mall 205 Target:


Then, the next event: dinner at Grüner. I have been hearing hype about Gruner for many months now, but this was the first chance I got to dine there. We started with a charcuterie plate consisting of, from top right moving clockwise, country pate, rabbit mortadella, salame gentile, liverwurst canapes, speck, spicy coppa, and house made pickles and mustard.


The speck was the star of the show. I have never had speck served like prosciutto. And, yes, I know speck is smoked prosciutto, but I usually see it diced and used in small amounts. Thinly sliced and served alone is a marvelous way to eat it.  Who knew?  The liverwurst canapes and the country pate came in a close second.

Next was frenched green beans, duck breast, blackberries, goat cheese, hazelnuts, black currant vinaigrette, and crisped shallots.  Absolutely delicious.


For the entree, we split grilled golden trout with a white corn ragout, crayfish sauce, and crisped speck and a mixed grill of sudan farms rack lamb chops and cevapcici - spicy slovenian lamb & beef sausages, cherry tomato-parsley salad, and cucumber-yoghurt salad with mint.


And this wasn't all the great food we ate.  Stay tuned for the rest of our eats!

Bon appetit.

Wednesday, September 14, 2011

Green Papaya Salad


It's a little weird that I am about to talk about cooking classes two days in a row. I have only taken four cooking classes in my whole life, and it just happens that two of them were in the last week. So here goes.


I heard about the Portland Culinary Workshop last winter and knew immediately I wanted to take a class. I mean, they have a turducken class. Any place that teaches turducken is alright in my book. I have been trying to fit a class into my schedule for months, and a couple of weeks ago when I saw that there was a Thai street food class on a night that I could attend, I signed up.


For those of you who read my blog regularly, you may have noticed that I do not specialize in Asian cuisines. The extent of my Asian cooking skills is as follows: peanut sauce, putting Sriracha on things, and curries made from store-bought curry paste. Oh, and my little sister taught me how to make fried rice recently. And I used to make Japanese food with some regularity, but haven't in years. It's strange that I can't/don't cook any Thai, Vietnamese, or Japanese food. Those cultures make some of my favorite foods.  Perhaps it has to do with the plethora of excellent Thai, Vietnamese, and Japanese restaurants in Portland, but I have decided I am going to change things. The Thai street food class was my first step in doing so.


The menu of items we made, with their Thai names, is as follows:
- Green papaya salad (Som Tom)
- Chive cakes (Kanom Gui Chai)
- Crunchy prawn cakes (Gung Foi Tort)
- Grilled pork skewers (Muu Bing)
- Sticky rice with mango (Kao Niaw)


One of the best parts of the class? I can and will make everything on that list at home. And I have started with the green papaya salad.


Green papaya salad is on my top 5 list of favorite Thai dishes, but I have always been too intimidated by it to try to make it myself. Why spend hours julienning green papaya when I can have it ready for me to pick up in 10 minutes from Pad Thai Kitchen? Loyal readers, check out this gadget:


The only thing the in English on the package of the instrument, which I picked up at Fubonn, was its name: Miracle. And miracle is it. This puppy can be used to quickly and easily julienne green papaya, or anything else that needs julienning. Seriously, it is as easy to use as a vegetable peeler. It can also be used as a corer and a slicer. Brilliant.


Now that I have the Miracle, I don't know why I would ever get green papaya salad for takeout. Okay, yes I do. Two reasons: laziness and sticky rice. Unfortunately, sticky rice is not quick or easy to make. And as much as I love cooking, sometimes I do not want to bust out a mortar and pestle in order to eat dinner.


I have ranted enough, and I think it's time to tell you how to make it.


1. Shred/julienne one green papaya into a large bowl.  


If you can't find the tool I showed above, you can use the big grates on a cheese grater, julienne it by hand, or I hear some food processors and other gadgets can julienne. Or if your initials are SD, SB, or are a family member, I can run to Fubonn and get you the Miracle. If your initials are BK, go to Fubonn your own damn self and get one; you'll need to go to get a green papaya anyway. Actually, SB and family, you have more asian grocery stores near you than you could hope for, so you should be able to find one yourself.  SD, I'll get you one if you want one. Can you get a green papaya in the mid-west? Maybe you'll never need the Miracle gadget. My goodness, I need to get back to the recipe.


Green papaya salad usually has tomatoes, carrots, green mango, green beans and/or whatever other vegetable you want. I added halved heirloom cherry tomatoes and a formerly green mango that had ripened to a regular ripe mango and wouldn't really shred so I only added some of it to mine and ate the rest by itself.  


2. Grind about 3 large cloves garlic and 3 Thai chilies into a paste using a mortar and pestle. I only cut off the stem of the chilies and ground them seeds and all, and I actually used 5 chilies. I like my food spicy, obviously, so adjust to your taste.  


3. Grate about 2 Tbsp palm sugar, add to the paste in the mortar, and grind to combine. I added more like 3 or 4 Tbsp because I also like my green papaya salad sweet. You may be noticing that this recipe can be altered to suit what you like, so alter away.


3. Add the juice of one lime and about 2 Tbsp fish sauce to the mortar, and grind/stir to combine.


4. Pour the dressing over the shredded green papaya and other vegetables and toss. Add about 2 Tbsp coarsely chopped peanuts. Toss again to combine.


5. Place in the refrigerator to marinate for a while. I don't know how long is necessary. Mine was in there for about a half hour because I made the dressing and shredded the papaya and mango then ran to the store to get peanuts and tomatoes. You could probably eat it right away and it would still be delicious.


6.  Serve, ideally with sticky rice to dip into the dressing. As I mentioned earlier, sticky rice is not exactly easy to make.  It involves soaking rice for hours and steaming it in a special steamer. I'll do it someday, but tonight, I served with jasmine rice. Also, the salad is usually served on top of cabbage leaves. I forgot about this until I had already left the store, but I really wish I could have done it up right. Oh well.


Make this recipe, and you will be feeling like you no longer need to get green papaya salad from anywhere except your own kitchen.


I have sort of understatement babbled on in this post, but I have one more thing to talk about. The Missoni for Target collection that launched yesterday. I arrived at Target at 7.50 am yesterday morning in order to be there before the doors opened at 8. Shockingly, many other Portlanders had done the same thing. This was the first designer for Target collection that I have truly had to fight with other people for the things I wanted. Of course I went for the clothes first, and once I had snagged what I wanted there, wandered over to the housewares. I grabbed a couple platters thinking I would likely put them back, but after getting approval from Santina, I bought one. Okay, I bought two. But they're so pretty! And they will be the best thing to happen to this blog since the seahorse plates my older sister got me for Christmas, so I think they were a good buy.  And one is featured in this post, if you hadn't put two and two together yet.


Bon appetit

Tuesday, September 13, 2011

Le Cordon Bleu Cooking Class: Appetizer Party


My wonderful parents got me cooking classes at Le Cordon Bleu for Christmas last year. Le Cordon Bleu holds a series of non-professional classes for the general public, and my gift was to pick three to attend. I went to the Italian class in April, the French class in June, and this past weekend, I went to the "Appetizer Party" class.


It was a great class, perhaps my favorite of the three. There were only three students, and the chef teaching the class seemed genuinely interested in teaching us some good techniques.


The four appetizers we prepared were clam and corn fritters, stuffed figs with gorgonzola, prosciutto, & balsamic honey, panzanella crostinis, and "empanadas". I have quotes around empanadas because what we made only very loosely resembles any empanada I have ever made or eaten. Is it okay to put any dough around any filling and call it an empanada?  In my opinion, no. I am not mentioning those empanadas again in this post.


Clam and Corn Fritters


2 strips thick-sliced bacon
1/2 cup finely diced onion
3/4 cup fresh corn kernels, or thawed frozen corn
2 cups all purpose flour
1 tsp salt
1 tsp baking powder
1 tsp Old Bay seasoning
1 egg
8 oz beer
1 cup chopped clams (from four to six oz cans) drained
1/4 cup vegetable oil


1. In a medium skillet, cook the bacon slowly until crisp. Remove bacon and set aside. Pour out enough fat from the pan to leave about 2 Tbsp behind. Finely chop the bacon and reserve.


2. Add the onion and cook over medium heat fro 2 minutes without browning. Add the corn and cook for 1 minute. Set onion and corn mixture aside to cool.


3. In a mixing bowl, combine the flour, salt, baking powder until thoroughly incorporated.


4. In a separate bowl, beat the egg and stir in the beer. Add the dry mixture from step 3 along with the chopped bacon, onion corn mixture, and chopped clams. Gently fold everything together until barely combined. Don't over-mix or the batter will become tough and gummy.


5. When ready to cook, heat a large, heavy skillet over medium heat and add the vegetable oil. Scoop individual portions of the batter into the hot oil; for bite size portions, use 1 Tbsp or for a more substantial size use a 1/4 cup measure. Cook until browned on the bottom and flip to brown the second side. Remove to a paper towel-lined plate to drain.


6. Serve with the following dipping sauce: combine 1/2 cup mayonnaise, 1 cup sour cream, 1/2 tsp Old Bay seasoning, 2 Tbsp finely sliced chives in a mixing bowl.  Keep cold until serving.


Stuffed Figs with Gorgonzola, Proscuitto, and Balsamic Honey


12 - 14 figs, cut in half
Gorgonzola
1 pack proscuitto
1/2 cup shallots, minced
2 Tbsp canola oil
1/2 tsp rosemary, finely chopped
1/3 cup honey
1/3 cup water
1/2 cup balsamic vinegar


1. Make the balsamic honey: in a pot, sweat the shallows in the canola oil. Add rosemary, honey, water, and balsamic and reduce until it coats the back of a spoon.  Season with black pepper and salt to taste.


2. Stuff the figs with gorgonzola and wrap with proscuitto.


3. Place on a baking sheet lined with parchment paper and bake at 375 degrees for 5 to 8 minutes.


4. When the figs come out of the oven, glaze with the balsamic honey.


5. The figs can be served with mixed greens or arugula on a salad plate.  Drizzle a little balsamic honey on the greens.


Panzanella Crostinis


1 French baguette
Extra virgin olive oil, as needed
2 cups diced tomato
1 cup diced seedless (English) cumber
1/4 cup diced Vidalia or other sweet onion
2 Tbsp capers, drained
3 Tbsp red wine vinegar
6 Tbsp extra virgin olive oil
Salt and freshly ground black pepper, to taste
1 bunch fresh basil
1 small head of romaine or green leaf lettuce


1. Preheat oven to 375 degrees. 


2. Slice baguette into 1/4 inch thick slices. Brush each side lightly with olive oil and place on a cookie sheet.  Place in the oven and bake until crisp and golden brown in color.  Remove and set aside.


3. In a mixing bowl, combine the tomato, cucumber, onion, capers, vinegar, and oil and toss well to combine.  Season mixture with salt and pepper and let sit for 15 minutes to 1 hour on the counter to marinate.


4. When you are almost ready to serve, tear the basil leaves by hand into coarse pieces and fold into the marinated vegetables.


5. Separate the lettuce into leaves and cut or tear into pieces slightly larger than the size of the toasted bread crostinis.


6. Place a piece of lettuce on top of each crostini and top with a mound of the marinated vegetables. Serve immediately.


At the Le Cordon Bleu classes, way more food is prepared than is eaten, so we end up taking a lot home.  The chef teaching the class was smart about leftovers, and packed up things like unfried fritter dough, baguette, and baguette dough for us to cook and eat at home.  The pictures here are the result of that cooking at home.


Bon appetit.

Thursday, August 18, 2011

Cook's Illustrated "Ultimate Chili"


The 2011/2012 cow is probably on its way to slaughter in the next week or so and will arrive in Portland at the end of the month.  I need to eat some beef!  So, beef stew meat, you are being made into chili.


I found this recipe on the Cook's Illustrated website circa 2004.  I printed it out and had it with my recipes for years.  I couldn't find it yesterday, so was THRILLED to find a version of it on the Epicurious website.  It's definitely some work, but man is it worth it.


A couple notes before we begin:


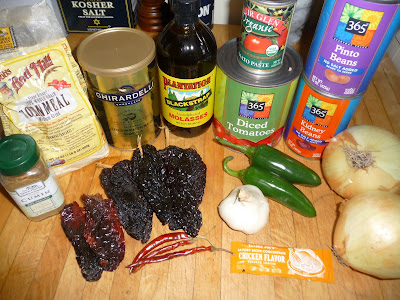
1.  I had 2 Anchos at my house already.  I first went to the regular grocery store for the regular ingredients, then hit up my favorite international market for the chile peppers.  They didn't have Anchos. I picked dried Pasillas to substitute.  When I got back home, I saw the notes for the recipe, which I did not have, stated that dried New Mexico or Guajillo chilies may be substituted for the Ancho chilies.  The store had both those types.  Let me tell you, Pasillas work too.


2.  The recipe calls for light molasses.   The store didn't have light molasses, so I bought regular molasses.  To the people out there who think that they can taste the difference between 2 tsps of light molasses and 2 tsps of regular molasses in a huge pot of chili?  Go ahead, I dare you.


3.  I didn't have oregano.  I thought I did, but I didn't.  I didn't want to go back to the store, so I omitted it.  I don't think oregano would have added anything.


4.  I do pretty much all my cooking in cast iron.  If you are using a cast iron skillet for the browning of the meat, the oil is unnecessary.


5.  I usually make my chili on the stove.  I was tempted to do so with this recipe, but I kind of liked the idea of putting it in the oven and not dealing with it; not checking if it was boiling instead of simmering, not taking tastes and burning the shit out of my mouth, just letting it cook.  It went well.  I think I will make chili in the oven always.


6.  My desired condiments:  grated cheddar cheese and sour cream.  Okay, really what I used was nonfat plain yogurt.  Same same but different.


Okay, on with the recipe.


6 dried Ancho chile peppers (about 1 ¾ ounces), stems and seeds removed,
and flesh torn into 1-inch pieces
2 to 4 dried Arbol chile peppers, stems removed, pods split, seeds removed
3 tablespoons cornmeal
2 teaspoons dried oregano
2 teaspoons ground cumin
2 teaspoons unsweetened cocoa powder
2 1/2 cups low-sodium chicken broth
3 tablespoons vegetable oil
2 medium onions, cut into 3/4-inch pieces (about 2 cups)
3 small jalapeno chilies, stems and seeds removed and discarded, flesh cut
into ½-inch pieces
4 medium garlic cloves, minced or pressed through garlic press (about 4
teaspoons)
2 (14 ½ ounce) can diced tomatoes
½ small can of tomato paste
2 teaspoons sugar
2 teaspoons light molasses
2-3 cans pinto, pinquito or kidney beans
2 ½ pounds blade steaks, trimmed of gristle and fat and cut into ¾-inch pieces
1 (12 ounce) bottle lager


Preheat oven to 300 degrees. Place Ancho chilies in 12-inch skillet over medium-high heat; toast, stirring frequently, until flesh is dry and fragrant, 4-6 minutes, reducing heat if chilies begin to smoke. Transfer to bowl of food processor and cool. Do not wash out skillet.


Add arbol chilies, cornmeal, oregano, cumin, cocoa, and1 teaspoon salt to food processor with toasted ancho chilies; process until finely ground, about 2 minutes. With processor running, very slowly add ½ cup broth until smooth, thick paste forms, about 45 seconds, scraping down sides of bowl as necessary. Transfer to small bowl. 


Place onions in now-empty processor bowl and pulse until roughly chopped, about four 1-second pulses. Add jalapenos and pulse until consistency of chunky salsa, about four 1-second pulses, scraping down bowl as necessary.


Heat 1 tablespoon oil in large Dutch oven over medium-high heat. Add onion mixture and cook, stirring occasionally, until any exuded moisture has evaporated and vegetables are softened, 7 to 9 minutes. Add garlic and cook until fragrant, about 1 minute. Add chili paste, tomatoes, tomato paste, sugar and molasses; stir until chili paste is thoroughly combined. Add remaining 2 cups broth and beans; bring to boil then reduce heat to simmer.


Meanwhile, heat 1 tablespoon oil in 12-inch skillet over medium-high heat. Pat beef dry with paper towels and sprinkle with 1 tsp salt. Add half of beef and cook until browned on all sides, about 8 minutes. Transfer meat to Dutch oven. Add ½ bottle lager to skillet, scraping bottom of pan to loosen any browned bits, and bring to simmer. Transfer lager to Dutch oven. Repeat with remaining oil, beef, and lager. Once last addition of lager has been added to Dutch oven, stir to combine and return mixture to simmer.


Cover pot and transfer to oven. Cook until meat is fully tender, 1 ½ to 2 hours. Let chili stand, uncovered, for 10 minutes. Stir well and season to taste with salt. Serve with desired condiments.


This recipe is not for the faint of heart.  It's not difficult; it's just time consuming.  I left my house at about 4.30pm to get the ingredients, was back by about 5 and started cooking immediately.  Granted, I was by no means rushing and much of the time is spent waiting around for the chili to cook, but I did not eat my first bowl of chili until after 9.


That said, this really is the Ultimate Chili.  It puts my easy recipe (see here) to shame.


Bon appetit.

Monday, July 18, 2011

Lazy Saturday and Tomato Cobbler


How do you think my cobbler compares to Martha's?


When Friday finally got here last week, I was so excited to get home and begin a lazy weekend.  The past couple weekends were filled with wine tasting, beer festivals, Fourth of July celebrations, and Superhero pub crawls (read: lots of drinking), so I was thrilled to camp out at home, stay in sweats, and spend some quality time in front of the TV.  I do want to note that, yes, I said "sweats".  It is still cold in Portland, and this past weekend was a rainy one.  Perfect for staying in.


When I woke up on Saturday morning, I grabbed a stack of neglected Martha Stewart Living magazines, crawled back in bed, and set out to plan a couple meals.  The tomato cobbler recipe was something that had caught my eye in the brief perusal of the July issue I had done right when it first arrived.  I am not a huge fan of raw tomatoes, but cooked tomatoes are so delectable.  It was the first recipe I marked as a "must make" for the weekend.  The other two recipes I marked, a strawberry rhubarb pie and Moroccan meat pies, did not get prepared.  The tomato cobbler is huge, fed me all weekend, and will continue to feed me for at least two more meals.  It is also exceedingly delicious.


For the filling:
1/4 cup extra-virgin olive oil
2 medium onions, thinly sliced
4 garlic cloves, thinly sliced
3 pounds cherry tomatoes
3 Tbsp all-purpose flour
1/4 tsp crushed red pepper flakes
Coarse salt and freshly ground pepper


For the biscuit topping:
2 cups all-purpose flour
2 tsp baking powder
Coarse salt
1 stick cold unsalted butter, cut into small pieces
1 cup grated Gruyere cheese, plus 1 Tbsp for sprinkling
1 1/2 cups heavy cream, plus more for brushing


1.  Make the filling.  Heat oil in a large high-sided skillet over medium heat.  Cook onions, stirring occasionally, until caramelized, about 25 minutes.  Add garlic and cook until fragrant, about 3 minutes.  Let cool.


2.  Toss onion mixture, tomatoes, flour, and red pepper flakes with 1 1/2 tsp salt and some pepper.


3.  Preheat oven to 375F.  Make the biscuit topping: whisk together flour, baking powder, and 1 tsp salt in a bowl.  Cut in butter with a pastry cutter or rub in with your fingers until small clumps form.  Stir in cheese, then add cream, stirring with a fork to combine until dough forms. (Dough will be slightly sticky).


4.  Transfer tomato mixture to a 2-quart baking dish (2-inches deep).  Spoon 7 clumps of biscuit dough (about 1/2 cup each) over the top in a circle, leaving the center open.  Brush dough with cream and sprinkle with remaining Tbsp cheese.  Bake until tomatoes are bubbling in the center and the biscuits are golden brown, about 1 hour and 10 minutes.  Transfer to a wire rack.  Let cool for 20 minutes.


I couldn't resist getting some strawberries when I was out purchasing the ingredients for the cobbler.  I cut them, sprinkled them with just a touch of sugar, and let them macerate.  There was heavy cream left over from the cobbler, so I whipped it and scooped a mound on the strawberries.  A perfect end to a perfect Saturday dinner.


Bon appetit.